Starlink: A few months in..

Working in the technology field while living in a rural area presents its own set of challenges. Speed, reliability, and latency are all factors that determine how effectively I can work. Outside my work needs we find ourselves in a world where access to broadband is less of a luxury, and more of a need. Pandemic response to education and work-at-home circumstances has also shown us the need to have stable access to the Internet in our communities. With all of the above in mind I am always looking for the best balance between cost and speed for access to the Internet at my home.

Waiting on a Dishy

I have been on the waiting list for Starlink since there was a waiting list for the service a few years ago. I signed up as soon as possible with the $99 commitment to secure my place in line, and anxiously awaited for confirmation of my order which had an additional $499 price tag with it to initiate delivery of my Dishy (What they call the antenna you install at your property). An email notifying me that my kit was ready is followed by the payment of the $499 and receipt of your tracking for the equipment.

For the most part it performs as advertised.  This weekend I installed a new router to load balance it and a CellularONE AirMax connection better than my previous equipment.  I also installed an entirely separate guest network that hangs directly off of the Starlink antenna to segment network traffic.  That guest network looks and feels much more like a typical user’s Starlink experience.

Installation

A few days later FedEx delivered my Dishy (along with ~50 others in my community). Unboxing and installation was very straight forward. My 8 and 10 year-old kids performed the majority of the installation. After a hole in the wall and dealing with the 100 foot pre-installed cable on the Dishy we plugged in the PoE injector, and the antenna began calibrating itself to the northern sky.
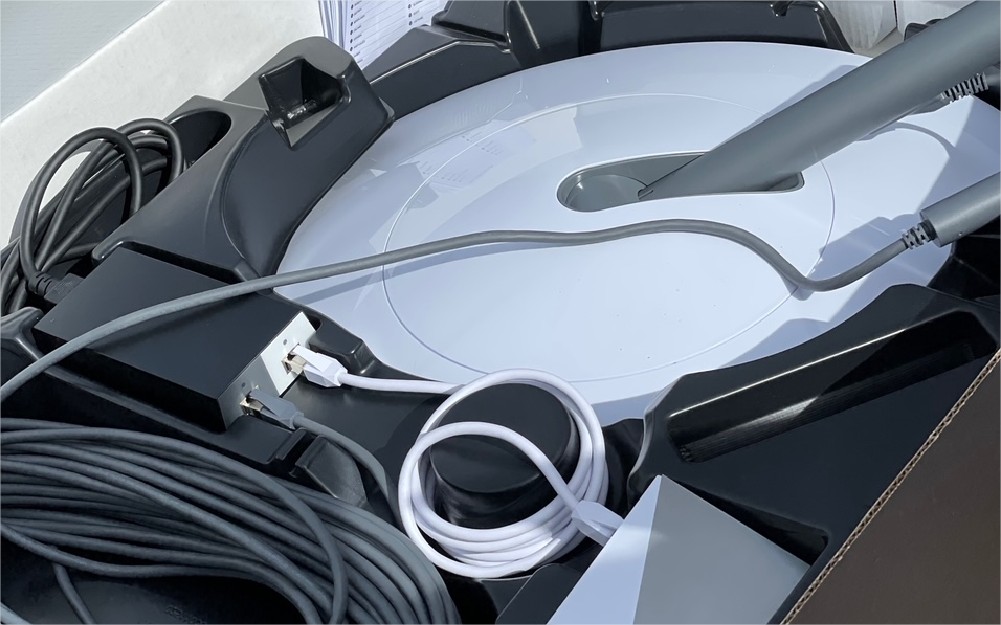
The kit comes with a router, but you do not have to use it. I plugged mine in for the initial start up and connectivity test, but an optional static route entry into your own equipment will provide you the access to your antenna’s statistics that you see through the router and the Starlink app. I leverage the statistics page on the antenna to verify connectivity and outage windows.

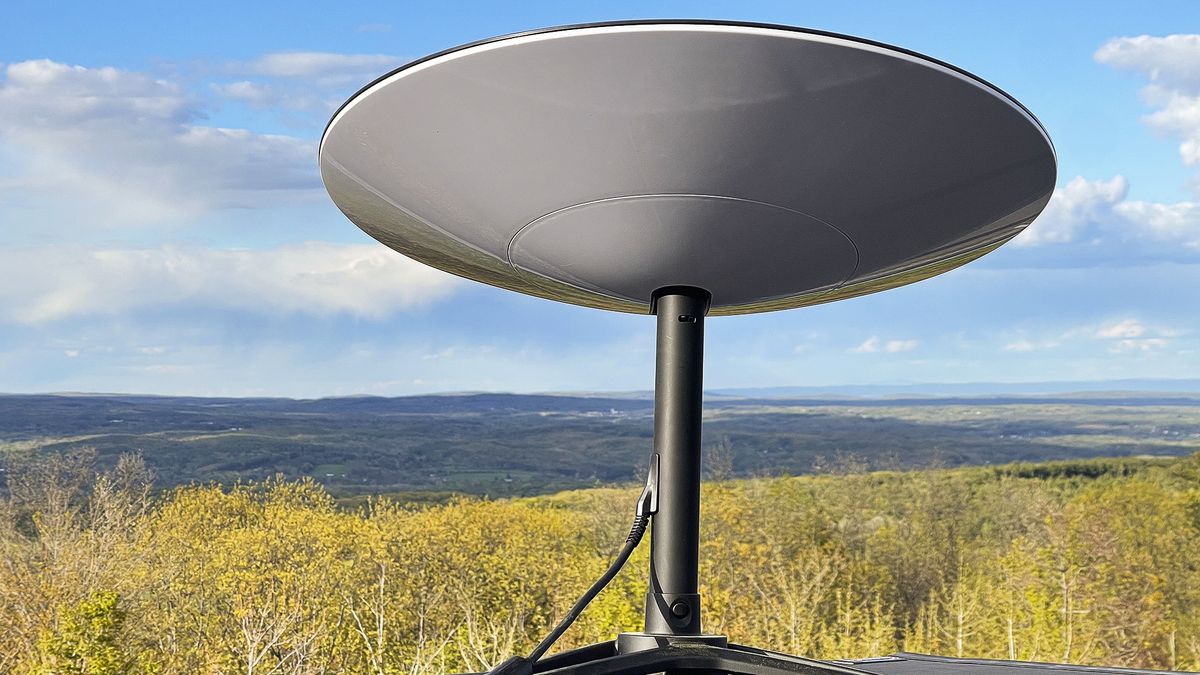
Mounting concerns? Starlink has different mounts to connect Dishy to various mounting locations. They offer a Pipe Adapter (allows you to use another pipe or Dish Network/DirecTV base for your Dishy) and a Volcano Roof Mount (base mount to be directly attached to a roof or flat service within 40 degrees of vertical). We presently have our antenna mounted with the default tripod, and I will likely use the pipe adapter for our final installation.

My initial speed tests are similar to what you see other people posting on social media. 100-300 Mbps download and 20-40Mbps upload are typical responses from Google, speedtest.net, and fast.com. There is much more to these tests that need to be commented on, and we’ll cover that a little later on in the Concerns & Caveats section.
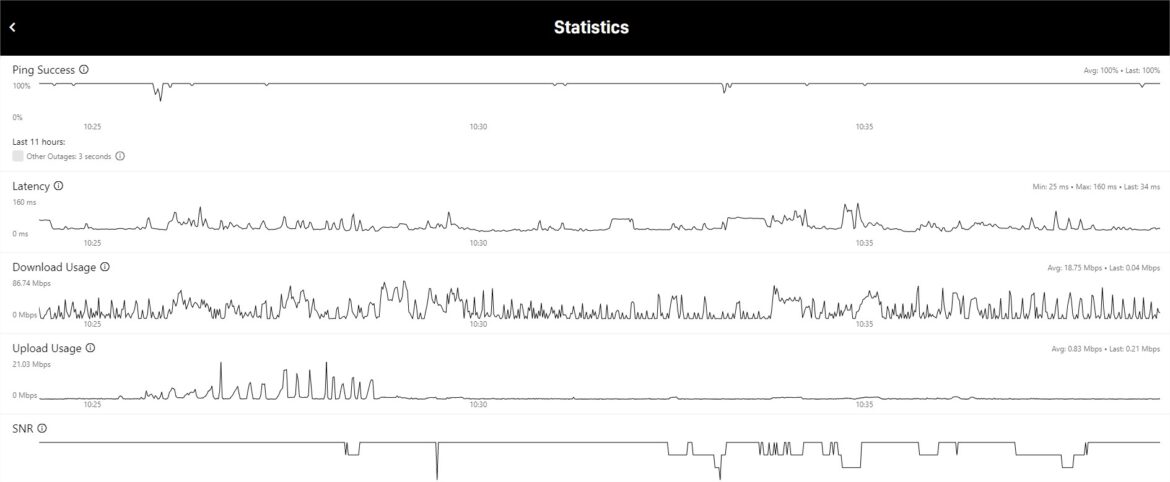
Now that it is setup, let’s fast forward approximately 90 days with using the equipment..

The Good stuff

  • Installation is a no-brainer – I discussed this already, but wanted to make sure to mention it as a positive of the service.
  • Video (1080p/4K) Streaming – We have tested many different streaming services, and all of them have responded well to Starlink. Most content and devices/displays are 1080p, but I have seen great results in 4K video streams as well. While Uncontrollable outages (discussed later) occur it is worth mentioning that we have not seen these outages cause buffering issues.
  • Download speeds – Having consistent access to larger download speeds has been the largest benefit of having Starlink. While working at home I have much, much quicker access to large files has changed how much and how effectively I am able to work. Also, the world revolves around constant patching/updating. These updates can be very large (Call of Duty players know what I am talking about), and it can drastically impact how much you can play.
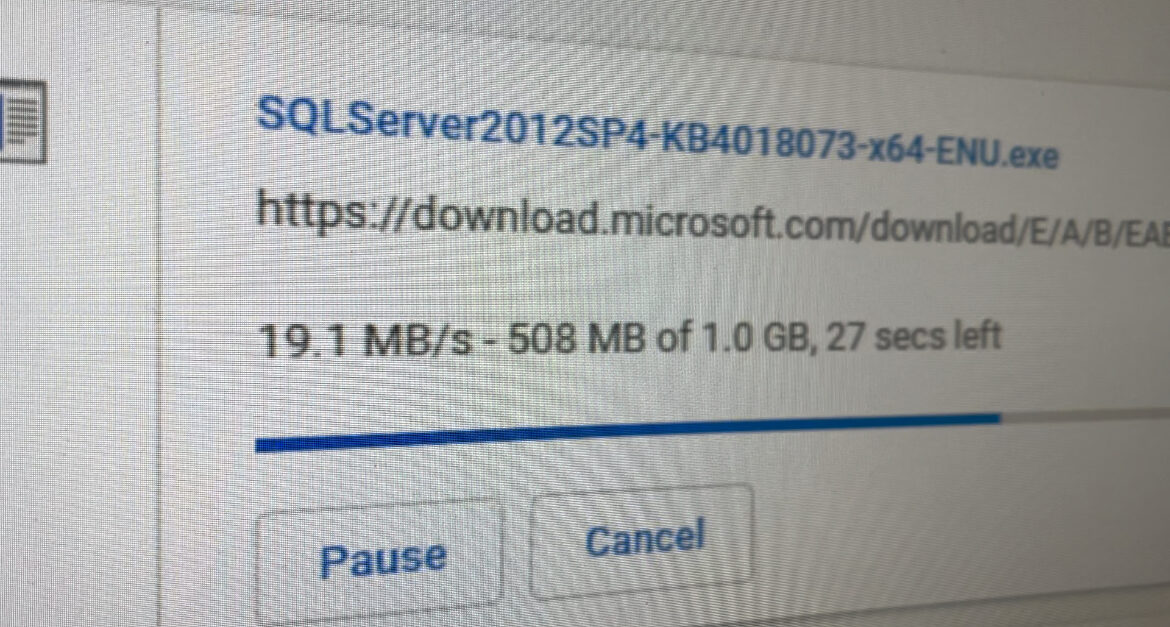
This is the first, real-life test I performed with Starlink. I always use Microsoft service packs as tests because they are typically large files, and access to Microsoft’s downloads are consistent. This speed is 15.28x faster than what was connected to the same machine minutes prior.

– Installation is a no-brainer.  Point at the north sky (unobstructed).  It came with a router, but I do not use it.- 4K streaming is no problem.- Large file downloads (Windows patching) is something I don’t even think about on Starlink.  Kid’s download full games on the PlayStation.  Before it was either buy the disc or plan on it taking days/week for it to complete.  I can work so much differently with build outs now.  I’m not waiting on updates anymore.- I don’t get frustrated with the connection.  I’m not waiting on it, and it doesn’t feel latent like traditional satellite connections.

Concerns & Caveats

  • No public IP addressing – This will matter for people who need access inside their network. If port forwarding means anything to you then you will need another solution or VPN service setup. I keep a CellularONE AirMax connection on my network to allow for redundancy and remote access that I need.
  • Uncontrollable outages – Currently, Starlink is advertised as a beta service. There are gaps in satellite coverage, and that can cause outages at different intervals. SpaceX is constantly adding satellites at three different elevations to their constellation which will help reduce the amount and duration of outages that occur. Also, at intervals your antenna will need to change which satellite it is connected to which will also cause an outage in that transition. Both of these situations will cause outages. For example: During a typical Microsoft Teams call lasting one hour I will see one or two outages that range from 10-30 seconds.
  • Loaded Latency – Speed tests reveal impressive speeds, but unless you dig in to the results of the test you will not see the other metrics being tested. Loaded latency is the term related to a persistent connection between your device and the Internet. Examples of people who rely on low loaded latency are gamers and currency traders. Typical loaded latency results that I am presently seeing are between 100-200ms+. People who care about latency will know how much those numbers affect them.
  • Physics (latency) – You cannot escape the distance these packets have to travel. The service is projected to improve through additional satellites in the constellation, laser communications between satellites, and additional ground stations. The distance that Starlink travels because of the LEO (Low Earth Orbit) nature of the system is significantly less than the 88,000 mile trip that HughesNET has with it, but it still is about 2,000 kilometers depending on which satellite you are connected to.
  • Upload speeds – “Speed test” results are unrealistic.  Real world uploads, in my testing, do not match the speeds that tests show.  It still does fine compared to most of the other options available presently in our area, but if you are looking for what people’s screenshots are posting the service is not there yet.
  • Line of sight – If you are looking to get Starlink make sure you download their app on your smartphone ahead of time and walk your property to check for obstructions. It will show you the view of the sky needed for Starlink to work at your location. Trees, houses, and other obstructions may determine if/where you would install your equipment.
  • Price tag – J.D. Power data suggests that people care more about quality and reliability than price. With that in mind people have to budget for Internet just like they do with everything else in their lives. $99/month for Internet is a tall order, and should be considered in the discussion of switching your ISP (Internet Service Provider).

Into the future..

SpaceX has committed to double bandwidth and cut latency in half latency by the end of 2021 with a vision of Gigabit download speeds eventually being available on the service. Should these occur it will make the monthly price tag even more appealing.

The service is a great option for many people in rural areas, but keep the caveats in mind depending on your needs. It may not be the best first option for you if latency and outages would impact your work (at this time).

To see all the options that we have in our area check out another post where I aggregate all our options together by clicking here.

What the StarLink?!

You may have heard the name Elon Musk before. Most likely it is in connection with PayPal, Tesla, or SpaceX. Another effort he has been working on is Starlink. This particular project is a system to provide a constellation of Low Earth Orbit satellites to provide Internet to the world. This approach differs significantly from the current satellite Internet model which involves much higher latency and significantly lower speeds with data caps.

Elon’s approach involves many satellites providing a mesh network in the sky with many gateways to the ground where the signal is routed more traditionally in the ground-based infrastructure. The proximity of the satellites to the earth allow for much quicker data transmission, and speeds that are conducive to what most households have come to expect from their internet connection.

Timeline: Starlink has been testing with a small group of beta testers near the USA/Canada border where the concentration of the satellites have been deployed. In February 2021, they opened up the program for more people to put themselves in a queue to receive the service. I am always interested to see how we can provide more bandwidth and options to our area so I signed up. When I signed up, and completed the payment process of $99 to hold my place in line, I was notified it was slated to be available in my area mid-to-late 2021.

Equipment: The concept is meant to be as simple as possible for installation and setup. The image below is the maps of the equipment I was told would come with the equipment.

Cost and anticipated speeds: The equipment cost is $499 plus tax/shipping and the service will cost $99/month plus taxes/fees. You will receive the setup illustrated above which is currently showing speeds of 50 to 150 Mbps (Megabits/second) with a latency of 20-40ms (milliseconds). More and more real-life data is coming in with users who have the service that are stress testing the service in various locations and weather conditions.

My hopes and expectations: I love the opportunity to live in the area that we do. My profession and hobbies rely on consistent bandwidth, and upload speeds that allow me to publish content effectively. My plan for signing up is to gauge this option against the other options that we presently have available to us right now, and may be getting in the next three to five years. I have family and friends who are limited in their Internet options who may drastically benefit from an option like this due to line-of-sight and distance issues from the few ISPs we have in our area.

I’m sure I will forget about signing up until I get a big update or hear someone else getting the service in our state, but when that happens I’ll be excited to get it setup and start beating it up. My biggest thought/concern right now is how it will hold up to the wind, and where I could place it to help mitigate that concern.

Stalink beta FAQ

Internet Option in Round Valley, and surrounding areas (v2.2 – updated on 5/26/2022)

There are many beautiful things about living in our area. The stars were beautiful last night, and I probably saw 5-10 vehicles on my drive home last night. Among the many, many reasons that bring people to our community broadband Internet is not one of them. It is a trade off we make for living where we do. In 2016 I updated my previous list of options, and wanted to refresh it for a new look based on what the last three years has given us.

I’m going to provide a bit of background information first, but feel free to scroll down to skip to my recommendation..

The FCC updated their definition of the word broadband, and how funding is allocated to areas based on what can be provided in those areas. The new baseline is 25Mbps download and 3Mbps per second upload. A few defitions for you:

  • Download is the speed at which data comes to you.
  • Upload is the speed in which you can send information to the Internet.
  • Mbps or Megabits per second is a measurement of data. For example, Netflix recommends that your download speed be at least 5Mbps to maintain HD quality downloading.
    • Further explanation: A megabit is different from a Megabyte by a factor of 8. When we talk about Internet speeds it is measured in bits per second, and when we discuss storage it is measured in bytes. Knowing the difference also factors in when you have a plan with bandwidth caps or limitations (Satellite and Cellular) as these limits will be calculated in GigaBYTES of overall usage. Confused yet?! Netflix provides an estimate to their customers for an average of data consumption based on the setting the users chooses for their video quality.

Back to our current options..

I wanted to update my list of the options we have in our area for Internet connectivity with a recommendation for what I believe is the best, all-around option for the typical, residential household. Here they are, in the order I would recommend them to a residential customer. There are obviously caveats based on the needs of the user, and specific limitations of each service. Please feel free to contact me with questions about what option is best for you and your home/business.


Recommendation – AirMax (CellularONE)

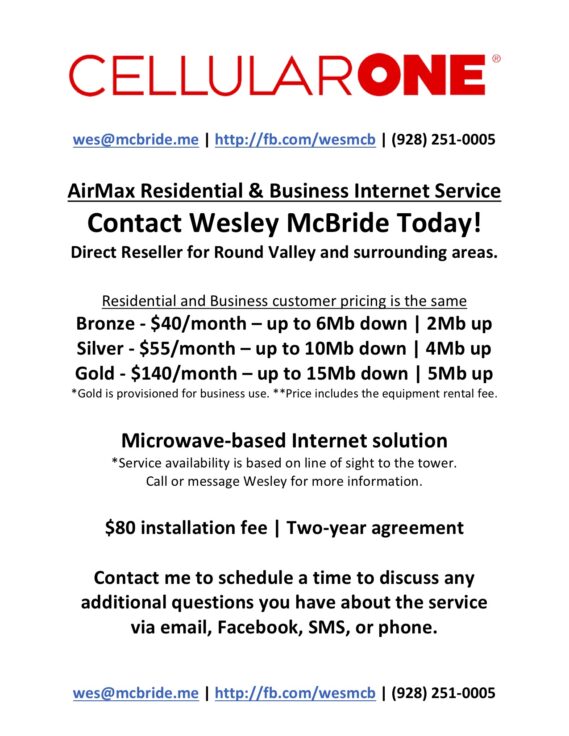
Bronze Plan – up to 6Mbps download and 2Mbps upload – $40/month

Silver Plan – up to 10Mbps download and 4Mbps upload – $55/month

  • Public IP addressing, if needed for port forwarding or remote services, is available in most areas.
  • Unlimited Data – no cap or throttling based on usage.
  • Service is based upon line of sight to one of the towers in your area.
  • Best upload speeds available. This means sending photos and data to the Internet occurs much quicker. If you perform backups (Carbonite) then this product will be appealing to you.
  • $80 installation fee & a two-year agreement

Most customers choose the Silver plan because the additional speed for $15/month is appealing when multiple devices and children are present in the home.

AirMax topped the previous list, and I still feel it holds it’s place at the top. In full disclosure, I am the local representative for this product, but I remain that representative because I feel like it is the best overall option for us. AirMax provides Internet via a wireless signal from a number of towers in our communities. There are currently two towers in Round Valley, one in St Johns, and one in Concho. There are also towers in Show Low, Snowflake, and Taylor for those a bit farther from Springerville and Eagar. This product is supported by a team out of Show Low, and I feel this helps reduce response time for outages and concerns. They are a smaller business, in the context of Internet Service Providers, so that can manifest itself also.

Source: AirMax Pricing


Recommendation – Starlink (SpaceX)

UPDATE (Added on 8/1/2021): The premise of SpaceX’s Starlink is Leo Earth Orbit (LEO) Satellite Internet. The satellites circling the globe are 300-500 kilometers from earth instead of thousands of miles away. This allows for higher bandwidth and lower latency than any other satellite offering. I was on the waiting list for this when it was announced, signed up on the first day the beta was released to our part of the world, and purchased it as soon as possible. It is currently up and running at my home.

Basic information regarding the residential version of the service:

  • 100-300Mbps download / 20-40Mbps upload
  • $99 to get in line
  • $499 to purchase the equipment when your kit is ready
  • $110/month for the service (price changed in Q2 2022)

Limitations to the service presently include:

  • No public IP addressing for anyone needing port forwarding on their network.
  • Proprietary equipment (Dishy/router) which limit options without the proper ethernet adapter depending on which version of the equipment you have.
  • Network outages/issues that can occur when switching satellites (concern for streaming and applications that need a constant connection).

There are now also business and RV options available (where the service is available).

Deeper explanation of their service can be found here: Starlink – A few months in..

Source: Starlink


Recommendation – Cellular (Verizon Wireless)

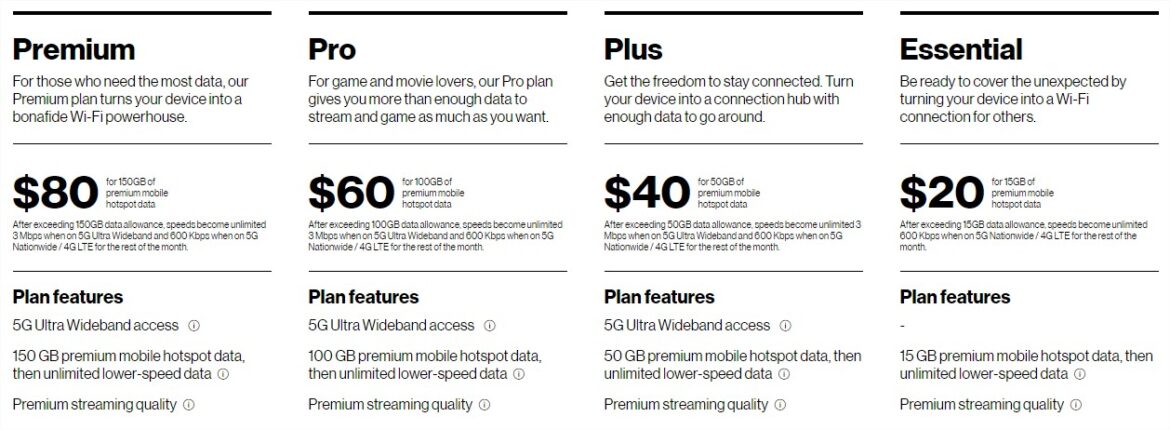
Verizon Wireless provides the greatest availability to bandwidth of all the options, but the service is capped. Your traffic is either deprioritized (on mobile devices) or throttled to 600Kbps up and down (routers, jetpacks, tethering). This impact is not felt as much on mobile devices, but completely changes things on devices meant to power computers and other wireless devices. Prices vary based on your need and the plan you currently have. I leverage this almost daily while I am away from my home to get my mobile devices online, but the data caps and cost keep it from being my primary Internet Connection. If you do not stream a lot, and only need minimal access to the Internet on your computers throughout the month then this is a good option to consider.

UPDATE (8/1/2021): Verizon now has additional hotspot plans that are feasible for a home Internet option for users without other options.

Source: Verizon Wireless


Alternative – aDSL (Frontier Communications)

Cable in the ground is what we all look for in an ISP. Reliability is increased and latency is typically decreased when we are hard-wired to our connection. Frontier has many limitations that hinder it as the best option in our area. While the service has no data caps, there are a number of caveats:

  • Limited upload speed ~400Kbps upload on most plans,which makes it hard to send large amounts of information to the internet.
    • This service is also an aDSL or asynchronous connection. Due to this your traffic down hurts your upload speeds, and your uploading hurts your download speeds. This cripples your connection when you try to send large amounts of information to the cloud or web services online.
  • Lack of availability to speeds higher than 6Mbps
    • Residents in Springerville have access to different plans based on their physical location. These users can get 12Mbps aDSL services, which make it a more enticing option. You call their local office for availability and pricing based on your physical address.
  • Lack of availability to new users. I hear from many residents that Frontier will not provision new services to their addresses. They have limited availability on their equipment for customers.
  • Pricing is all over the place for the same plan.

Alternative – Wireless (Wi-Power/TWN Comm.)

This service functions similarly to the recommended AirMax solution, but their pricing structure is different. I recommend Wi-Power under other options because similar speeds are more expensive with Wi-Power. They do not publish their pricing online, but when I spoke with them last they provided similar plans to AirMax for $10-45/month more based on your area and line-of-sight to certain towers in the area. While this is better than Frontier’s aDSL option, you can get more bandwidth up and down for less month with AirMax. Agreement lengths and installation fees vary based on current promotions.


Alternative – HughesNET or VisaSAT Satellite (Various Providers)

Satellite brings broadband speeds to areas with not other options. There are many different vendors who all provide similar plans and pricing. These plans all have low data caps where you either pay more money to “boost” your speeds back up, or are throttled to slower speeds until the end of your billing cycle. There is also an inherent latency issues with satellite because of the distance the data must travel to get to you. Pricing is not comparable to the other services listed above. For those with no other access to the options above, this is your only real option for connectivity.


To wrap things up..

We all wish for more bandwidth today in a world of streaming everything. I have found a balance of services that work best for my family and work needs, but each need and family is different. Drop me a text or call today at (928) 251-0005, and we can discuss which option will help you the most.

Migrating To/From Google Apps From/To Gmail

I had a friend ask about his son’s Google Apps email account.  He would be loosing access to this account soon and would like all of his communications for archival purposes.  His son had just returned home from his mission, and wanted to make sure he got all of his emails before his account was disabled.  So I figured I would make a step-by-step to super simplify getting your emails moved over, after you get back.

1 – Signup for a gmail address.  While not signed in to any account goto http://gmail.com and create an account.  You are not 13 anymore so lets try and avoid superhappytime14 or soccerisdabest1983.  More and more people criticize on our digital life, and a professional looking email will only help.

2 – Once signed up and logged in, click on cog wheel and then mail settings.  Inside mail settings click on Forwarding and POP/IMAP.  There you will just need to verify that IMAP has been enabled. (It should be by default.)

3 – Log out of your new professional sounding gmail account.

4 – Log onto your mission email address. http://myldsmail.net

5 – When logging in your will be prompted with information saying your account has been disabled, please note the information the give you.

EXAMPLE:

POP Server: pop.gmail.com

User Name: john.smith@myldsmail.net

Password: $up3rg00dP@ssw0rDH3r3

The information we care about is the User Name and the Password.

6 – From your myldsmail email interface click on cog wheel and then mail settings.  Inside mail settings click on Forwarding and POP/IMAP.  There you will just need to enable IMAP and after saving leave all other settings as they are.

7 – Goto http://gmail-backup.com/download (Windows-based Application) and download the newest release of their software (at publication this process was successfully done with version 1.07)

8 – Install and run the software

9 – Enter the entire User Name into the first field labeled gmail login. Remember that is john.smith@myldsmail.net and not your username you usually login with.

10 – Enter the password provided in the next field below.

11 – Click Directory and make a new folder somewhere (I put mine on the desktop) to save everything in.

12 – Change the Since Date field to appropriately reflect the entire mission of your missionary.

13 – Click the Backup button, and then depending on how avid of a typist you were as a missionary, and how many pictures your sent you may be here a while.

14 – Once completed, change the gmail login and password fields to reflect your new professional looking gmail address.

15 – Click the Restore button, and again dependent upon your Internet connection and backup size you will be here for even a longer amount of time.

16 – Hooray, your email has been migrated to your new inbox.  I found that the emails were accessible when clicking on  the All Mail button, but then can be moved back into the inbox by highlighting all messages and clicking the Move to Inbox button.

17 – After moving your mail, you may want to snag your contact as well.  To do that:

  1. Sign in to myldsmail.net
  2. Click Contacts along the side of any Gmail page.
  3. From the More actions drop-down menu, select Export….
  4. Choose whether to export all contacts or only one group.
  5. Select the format in which you’d like to export your contacts’ information. Please note, some of these formats can lose some contact information.
    • To transfer contacts between Google accounts, use the Google CSV format. This is the recommended way to back up your Google Contacts.
  6. Click Export.
  7. Choose Save to Disk then click OK.
  8. Select a location to save your file, and click OK.
  9. Log out, and log into your gmail account
  10. Click Contacts along the side of any Gmail page.
  11. From the More actions drop-down menu, select Import….
  12. Locate the downloaded google.csv file, and click OK.
  13. Your contacts have now been imported into your new gmail account as well.

*Gmail contacts method partially taken from Google Support

18 – Alright sir/mam, you are ready to take on the world with all the emails from the past two years (or eighteen months).

Remote Computer Control with Google Chrome

There are times that you need to show someone how to do something on the computer.  It always isn’t the shortest drive to that computer, so one may look for an option of remote access.  While there are many options available, Google Chrome now has an App that integrates with it’s browser to provide that functionality as well.  You will obviously need Google Chrome, but once you have that downloaded and installed download the Chrome Remote Desktop App.  After getting it installed on your and the remote computer, all you need to do is get the remote access number from other computer and connect.

Source: Lifehacker

Connect Safely | Help for parents

I heard about Connect safely from Larry Magid on TWIT, and felt it worth sharing.  Connect Safely is a site dedicated to helping parents direct their children to safe and secure web browsing.  On TWIT they were highlighting their book/pdf about Facebook.  I think it is a great resource for parents looking for help with the huge experience we call the Internet.  Browse on over to connectsafely.org to educate yourself and your children.

Also, TWIT or This Week In Tech is site compiling many podcasts hosted by Leo Laporte for all sorts of technology news.  His shows are useful and information for all users of technology.  There is something for the novice and the expert.  Head on over to TWIT.TV

Microsoft H5D LifeCam Cinema

Ever since I got a MacBook Pro I haven’t had to worry about a webcam for Skype or some random need  to capture video quickly.  The built-in iSight camera does a great job for what I needed.  When my Aunt moved into an assisted living facility, I decided it would be neat if we could get her to use Skype to chat with us.  We tested it out for the first time last weekend, and it turned out great.  Click here to see the call in action She enjoyed it, and we plan on doing it in the future.  While preparing these plans I looked around for a nice webcam for my workstation.  I found the H5D which had nice reviews so I picked one up at TigerDirect.  The reason I pulled the trigger on it was the compatibility with both Windows and OS X.  The video on my blog shows it running on my MacBook Pro.  The picture quality was great (720P), and I would recommend this unit to someone wanting a better quality Skype call than a less-expensive webcam would get you.  I also bought a Logitech C250 for $19.99, also at TigerDirect, and while it works fine with her Windows 7 laptop, the video quality is definitely much more grainy than the LifeCam.

Unlock your files with Unlocker

Mostly likely you have been presented with the lovely Windows error message stating that Access is denied and you cannot delete some file.  Enter Unlocker 1.9 to solve the mysterious locked files holding strong to your computer’s hard drive.  Once installed Unlocker is as simple as right-clicking on that file and running the Unlocker program.  It will free up that file and even help you delete it.  It is a nice little tool to have for those pesky and stubborn files on your Windows-based computer.

Click here to download Unlocker 1.9